Soldering Practice with Honda CD LCD Driver
Looking over the control circuit board for a Honda in-dash CD player, I saw an LCD driver chip which is a close cousin of one I worked with earlier in a Toyota tape deck. Even though I've never seen this CD control LCD run, and lacking the parts to reassemble the CD player, I think I have a chance to get it running just based on a datasheet and my recent experience. I do have a few obstacles I'd need to resolve first, though.

The first is that this section of the circuit board is coated in a conformal coating that prevents me from making electrical contact. It is also slightly sticky, which made it hard to work in this area. Every action adds debris stuck to this coating. Trying to wipe them off made things worse, as the coating grabbed fibers from my cleaning cloth.
I first tried isopropyl alcohol, which I understood to be the default cleaning solvent for electronics. I had hoped it would dissolve the blue coating but I saw no effect. I have a collection of household cleaning solvents harsher than isopropyl alcohol, but I don't know which of them would damage electronics. Abandoning chemistry, I turned to heat: I put a small blob of solder on the tip of my soldering iron and touched it to the pins, hoping it will melt through the coating. The good news is that it did, the bad news is that it immediately heated the pins and existing solder and everything blended together into a bridge that connected all the pins I cared about plus many more that I did not. This was because of my second obstacle: these pins has very fine pitch. Datasheet says this SQFP80 package has 0.5mm pitch, which is far denser than the 0.1" (~2.54mm) pitch I usually work with.
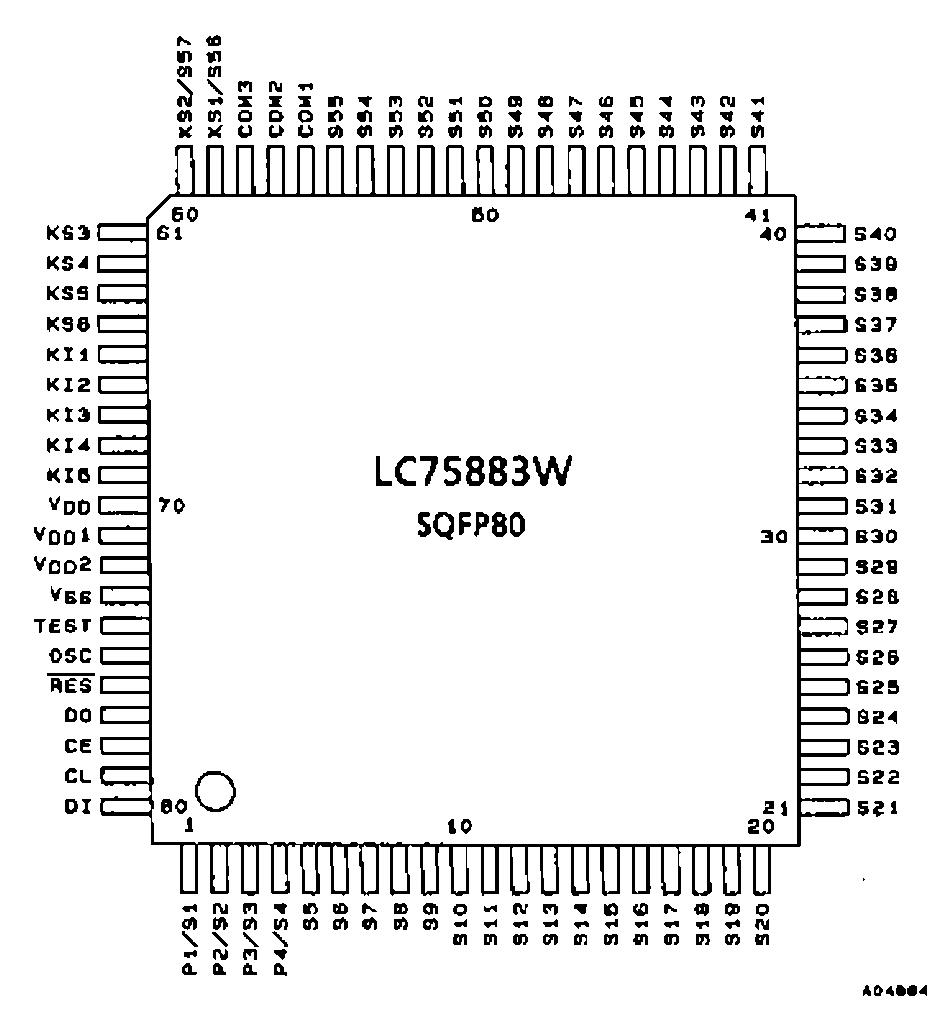
My attention was focused on the following pins:
- 70: VDD +5V power supply
- 73: VSS ground
- 77: DO Data Out
- 78: CE Chip Enable
- 79: CL Clock
- 80: DI Data In
And now I have a large solder blob that gave electrical continuity across all of them. Gah! Unpracticed at this scale, it took me over an hour to get the situation back into some semblance of control. Solder sucker took care of the major blobs, de-soldering braid took care of smaller portions, and a hot air gun melted off lingering whiskers. It was a disaster zone but I'll be optimistic and call it practice. I still see signs of extraneous solder on the surface, and no guarantee there aren't any hiding where I can't see them. On top of that, all the heat to clean up the solder mess may have damaged the chip. Still, I had nothing to lose but time and everything to gain, so I proceeded.

I took the finest, smallest gauge wire I had on hand and soldered the first one to pin 80 DI (Data In.) And clearly this is not going to work: the wire is far too fat. But at least the conformal coating has been removed from these pins. So even if I can't solder directly to these pins, I can use my meter to probe for another way to connect.